Collecting birch sap for mineral water, wine, beer, vinegar and syrup
23rd March 2012. 6.30am, 0 °C brrrrrrr!
I’ve a confession: although my long-standing interest in wild food cookery does add incredibly wild and nutritious versatility to my daily menu with respect to rich soups, unique salad combinations and intriguing side vegetables – all very health promoting and worthy; truth be told, I’m actually somewhat of a sugar addict. Yet, for the most part, sweet wild foods are associated with the abundant fruitfulness of summer and autumn – apples, pears, cherries, blackberries, bilberries, mulberries etc, and as delicious as such fruits are in their unprocessed state or as fruit leathers, their sweetness is invariably counterbalanced by varying degrees of acidity. Hardcore, unadulterated and non-toxic sweetness is actually quite hard to come by in the natural world, at least where I live.
Yet, from as early as the final week of February (Southern England) until as late as the end of April (Scotland), and with a similar early to later coming of the spring across the different states of the US, that hardcore sweetness lies quite literally in untapped abundance, residing in diluted form within the trunks of some of our commonest trees: Birch (Betula species), Lime (Tilia species), Sycamore (Acer species), Walnut and various others. All, in theory, can be successfully tapped for their sap, the first two providing the best results in my experience. Birch, especially, is fail safe!. Indeed, on the basis of research and reports of success in this regard, I’ve tried to tap both walnut and sycamore for sap from February to April for the past 7 years, but without success. This year I intend to try our only UK native maple for the first time: The Field Maple (Acer campestre). For the purpose of this article then, ‘sap’ refers to birch sap only.
But why bother doing this? This is a question I'm frequently asked, quite often by people who have tried and have been disappointed that what drips from the tree tastes pretty much like water, not the sweet ambrosial nectar they had expected. Well, it's a reasonable question I suppose. There are many answers. In the Ukraine and parts of Russia the sap is collected and sold as a type of mineral water, so they clearly value it. A fantastic, easy to make and reliable white wine can be made with a very distinct and pleasant taste, as well as beer, vinegar (see recipe at the end) and a rich caramel and molasses-like syrup. But, above all else, as with all foraging, it provides an excuse and opportunity to arrange your life according to the cycles of nature rather than the oppressive dictates of work routines and the terrible tick-tock tyranny of clock time or even traditional calendars. Each year I try to refine my understanding of when the sap flow begins and when it's in full swing. This year it begun a day before the spring equinox, 5 days after reports that frogspawn was appearing in local ponds, and two days before the wood ants began to awake from winter slumber as they amassed to form new colonies. This is the realm of magic, awareness, and attunement, connecting with life, poetry and mystery and clocks serve no purpose!
The sap then, which is actually about 95% + water, minerals and a little sugar, can be evapourated off to make a sublimely delicious if somewhat energy intensive syrup – it is the absolutely perfect accompaniment to elderflower fritters. In fact, the only near equivalent you can buy in this country is maple syrup. That is commercially viable because the ratio of sap required for a litre of syrup is 30:1, whereas for birch it is between 80 and 120:1 (I usually find that a 95:1 ratio is perfect). But don’t let that put you off. Once you’ve tasted birch sap syrup, the effort required to make it will seem more than worthwhile. For those who are unconvinced there are several other excellent uses for the sap once collected as I shall explain below, as well as various birch-related bushcraft skills to practice while the sap is simmering. First, though, how exactly is it obtained?
There are several possible collection methods; here are just a couple. Between the end of Feb and mid-April when temperatures are usually between 0 and 15 °C – but especially in the second half of March, take a metre length of 0.5-1cm diametre plastic tubing, a 2 or 4 litre plastic bottle (keep spare tops to put on the bottles when returning to pick up the sap - or just return with a large container), a drill with drill bit the same diametre as the plastic tubing, a piece of tissue or cotton wool, a lump of plasticine (modeling clay) or natural clay, a wooden bung and a hammer. Select a suitably sized and well-established tree – at least 8-10 inches across. Also, especially if in a woodland with lots of birch competing for space and light, go for the trees with the largest crown of branches. These will have the best sap flow. Mark a spot 2-3 feet up from the tree’s base. (In fact, you can tape a collecting vessel to the main trunk 15 foot up the tree if you don’t want it to be disturbed – useful if the trees are in an urban environment where your collection set-up might be tampered with lower down).
With the drill bit angled about 30 ˚ up from the horizontal (although straight in is fine too), drill a clean hole about 3-4 cms deep into the tree (however, see text in red below). Blow out bits of debris (close your eyes!). Liquid should drip from the hole within 10-20 seconds at the rate of 4 or more drops per second at the peak of sap flow. If not, hammer in a wooden bung or piece of clay and try another tree. Push one end of the plastic tubing 1-2 cms into the hole so that it is held firmly in place. Place the other end into the collecting bottle, far enough in so that it can’t slip out. Gently pack tissue or cotton wool around the tube at the neck end of the bottle, allowing the air to escape as the bottle fills with sap and to prevent insects from getting in (you can just cut or melt holes into the top of plastic lids – but make sure it isn’t a completely tight fit as you need to allow air to escape from the bottle as it fills up). Scoop out a handful or two of soil at the base of the tree and place the bottle in the shallow hole created to prevent it falling over. As a precaution, to prevent any leakage, you can roll out and press a small piece of plasticine or clay around the tube to make a perfect seal with the tree trunk. Leave for 12-48 hours, after which time the bottle will most likely be brimming with sap. Alternatively, you can use a small length of tubing or a small elder stick after clearing out the soft central pith, and allow the sap to drip freely into a collecting vessel such as a demijohn – preferably using a muslin covered funnel to direct the liquid and prevent insects falling in (or use a maple tap). In woods where there are wood ants, the ants will amass around any exposed sap. Finally, plug up the hole to prevent infection of the tree, particularly from fungal spores. Hammer in a hard wood bung, firm piece of cork cut to size, some clay or, as a temporary measure, a piece of plasticine. Whatever I use, I always line it with fresh cherry resin. Resin production is a tree’s healing response to mechanical damage so is worth using. It also makes for a really good seal. I take no more than about 4 litres per tree, and only tap the same tree on alternate years. Nevertheless, some people will tap continuously from one tree throughout its entire period of sap flow, but only return to that tree every 4-5 years; others take 2 litres and return every year to the same trees.
A great drill, but often hard to see when I put it down among the forest floor leaves!
The method I use described below is the one I find works best for me in terms of efficiency, and is born, in large part, out of trying to do minimal damage to the tree. Do bear in mind though that there are alternate views. I spoke to my friend Miles Irving (of Forager Handbook fame - a great book) the other day; he is new to birch tapping so we went out and got to work. Later he spoke for an hour to the chap who supplies the now world famous Copenhagen restaurant, Noma, with birch sap. He taps birch in Norway, drilling half way into the tree, tapping the same trees through out there sapping season. He also believes that blocking up the holes afterwards is actually more likely to lead to infection than leaving them exposed. I think sealing the hole creates a good physical barrier to the entry of fungal spores and other possible agents of infection. The alternative view is that, left to its own devices, the trees will actively produce more antifungal and other protective substances around the damaged tissue, and that blocking the hole slows down that natural process. An interesting idea I’ll investigate further and update here.
When I first tapped trees 15 or so years ago I did try drilling much further in, sometimes as far as half way in, but found no increase in the speed and volume of sap collection. A good test would be to drill half way into one side of the tree, fitting tube and collection vessel, and only an inch the other side, as I usually do, setting collection equipment in the same way. I shall try this next week. Okay. I did this test on 4 trees on 12th April. On each tree I drilled in my usualy way - just a couple of cms, AND drilled a separate hole going right to the heart wood. On all 4 trees, the containers connected to the heart wood tapping hole produces 3x the sap volume of the other one in the same amount of time.
But, really, to answer the question I’m frequently asked: Does tapping damage the tree? Well, of course, drilling a hole into a tree is damage, but let’s not forget, as indicated above, birch are resilient, with natural healing mechanisms that activate to heal such damage. Four years ago my friend had tree surgeons cut many large branches from the silver birch in his garden at the peak of sap flow. Sap rained down for two weeks. Today the tree is strong and healthy. On the other hand, you may make one small hole to tap a tree and decide not to plug it afterwards. Now, perhaps due to drought or other environmental conditions that tree has been severely stressed for a number of years. Normally its own defences would help fight infections, but now when the spores of birch polypore or some other fungi enter the exposed hole, they don’t encounter the usual resistance, sprout and infect the tree, ultimately killing it (or at least speeding it on to its next level of existence as food for the forest). So there is no simple answer, other than try to be sensitive and aware of when it is and when it isn't appropriate to tap.
Unless you intend to use the sap for cooking or drinking immediately, refrigerate and use within 2-3 days. If you decide to tap one tree throughout its sap rise, empty out the collecting bottle within 48 hours (at the latest - after 24 hrs if the temp is above 10 °C) of tapping or when your collecting bottle is full – whichever occurs first. If you leave the container over 2 days before collecting, the natural yeasts present may already have stated to ferment the sap, using up what little sugar there is, giving rise to off flavours - these become intensified when reduced down during syrup production and are to be avoided. Note: if you want to transport large quantities of sap, I recommend scrounging several of those large 18 L capacity mineral water bottles seen in offices. These are also excellent for wine making.
Boil the sap until it is thick and dark, barely simmering at the final stages to prevent the disaster of burning. Indeed, at the latter stages the pan should be just on hot embers – no direct flame). Indeed, once the volume of sap is reduced from 95 to about 5 litres, I usually transfer the syrup to a new pan and place indoors on the hob at the lowest flame setting - not even simmering. Also, unless you want to deep steam clean your kitchen or make the wallpaper peel off, this is definitely a job to do most of outside. Alternatively, ask a friendly baker if you can place a large metal tray of sap on top of his bread oven to slowly evaporate. Taste repeatedly as you concentrate the sap to reach your required degree of sweetness. It is inevitable that the sugars will partially caramelize, that however is just an integral part of the flavour (in the absence of expensive industrial machinery to produce the syrup using reverse osmosis). If concerned about burning there is no need to reduce 95 L sap to 1 L of syrup. The ratio of 50:1 also makes for a gorgeous but lighter and runnier golden brown syrup.
Evapourating off the water and removing scum.
It can take 4-5 hours or more to make a litre of syrup. That time, however, presents a real opportunity. You can collect birch bark for fire lighting, collect birch polypores for making razor strops, paper, shoes or, best of all, you can make birch tar. I did this last year following talented bushcrafter Jonathan Ridgeon’s excellent online tutorial: http://www.bushcraft.ridgeonnet.com/birchtar.htm
Or how about collecting some bark and making a simple birch bark and spruce root basket: Perfect for collecting the stunningly impressive Scarlet Elfcup fungi that are still in season now.
Nevertheless, if syrup making still seems too much trouble use the sap to make a lovely refreshing wine instead. It’s easy and is definitely not a second best alternative. Start by making a high alcohol tolerant wine yeast starter culture. For this, simply follow the instructions on a packet of wine yeast – usually this involves adding a teaspoon of yeast and sugar to about 3 fl oz of boiled and cooled water that is then shaking in a clean sterilized bottle. The top is loosely fitted on and the bottle left in a warm place for about four hours or until the yeast becomes active – you’ll notice bubbles rising and a little froth forming on top. Next, sterilize 2 demijohns, 2 rubber bungs, 2 air-locks and 1 plastic funnel – the products used for cleaning babies’ bottles are fine for this purpose. Put 8 pints of sap and 1kg of sugar into a large pan and bring to the boil stirring in all the sugar. Add the juice of 1 lemon and 1 teaspoon of yeast nutrient. Empty and rinse the sterilized demijohns with boiled (but cooled slightly) water. Divide the sap equally between the 2 demijohns, pouring in using the sterilized plastic funnel. Allow to become luke warm before adding the yeast starter culture and fit bungs and air-locks. Leave in an airing cupboard for 5 days before transferring all the sap into just one of the demijohns. Ferment until no bubbles appear in the air-lock (2-3 months).
Birch sap wine in demijohn and glass.
Spoons showing commercially produced
maple syrup (left) and birch syrup (right).
If you're feeling both naughty and adventurous you could also get hold of an old-style basic pressure cooker, a siphoning tube, a bucket of cold water and a demijohn to distill your birch sap wine to make birch sap moonshine. That could then be used for Russian-style preservation of gorgeous chanterelle fungi, gathered from around the same birch trees you have tapped. Of course, it would be illegal so I must advise against it. I just said "you could", not "you should".
Chanterelles preserved in alcohol
Finally, you’ve decided you’d like to try out some of the suggestions above but, it’s 1st April, you’ve drilled a hole and are standing there feeling like a true April fool because not a drop of sap is flowing out. Don’t worry, the sap rise is over. The leaf buds are swollen and bursting into life. Excellent! The young tender leaves are good for tea (would be a good experiment to ferment them in the way true tea leaves are) and excellent as a mild bulk salad leaf. But don’t miss this opportunity either as the leaves only stay tender for about 2 weeks!
Birch Sap Balsamic Vinegar Recipe
(Linfa di betulla aceto balsamico non tradizionale)
2 litre capacity vinegar aging barrel
Ingredients (makes approx1.5 L)
190 L fresh birch sap
1 sachet high alcohol tolerant wine yeast
MethodBoil the birch sap down to 4 L. Place half of this i.e. 2 L into a sauce pan and carefully (on lowish heat) very gently simmer, reducing down to 1 litre. Pour half of this into a wooden barrel and leave for 4 months; pour the other half into a sterilized glass bottle and seal. Place the other 2 L in a sterilized 1 gallon demijohn. When warm or cooled sprinkle on the yeast (or use wild yeast cultures if desired). Fit an air lock, place in a warm cupboard, and ferment until no bubbles appear in the air lock (approx 4 months). Uncover and expose to the air and fruit flies for a few days. Then cover with muslin and allow to turn to vinegar. This takes about 2 months. Pour vinegar into wooden barrel to add to the syrup already in there. Age for 25 years, transferring the vinegar to a smaller barrel of a different and suitable wood variety every 5 years. Finally, ballance the sweetness and acidity by adding some of the bottled and pasturised syrup..
Confession (you probably realize this already!): I've not done this, at least not completely. I have followed this recipe and aged the vinegar for 3 years. I've also experimented by just letting pure sap ferment (I say 'experiment', but actually it was a mistake as I'd not sterilized the bottles well enough. But, of course, there are no mistakes! It made me realize that it was worth exploring as vinegar and, in particular, a balsamic style vinegar). The flavour of that spontaneously fermented sap is different from wine that has been turned to vinegar, hence the different stages in the recipe. This recipe is the nearest I've managed to get to something approximating balsamic vinegar using only wild ingredients. It tastes good, but would be fun to age some for the length that Aceto Balsamico Tradizionale is aged............
One final thought............
Do keep your eyes peeled for Birch Polypore fungi, also known as Razor Strop Fungi, as you are bound to come across them when you're out looking for suitable birch trees to tap. These can be found on dead standing trees or on toppled trunks and fallen branches. Of course you can make razor or knife strops with these, but far more fun in my opinion is to use them to make paper. Be careful not to have the fungi knocking about in your bag with your drill. It will get contaminated with spores and you may end up infecting previously healthy trees!
A good crop of Piptoporus betulinus
Top side
Underside showing the pores
The other day I collected a whole sac full of these. I dried them for future use in The Foraged Book Project for making paper for that book, scraping off the brown outer layer once they were dry.
Eating Wild Food: The challenges, benefits and consequences.
Leaf Inspiration: A transition from autumn to the realm of pure mystery and magic.I don't know who created the following image or how they created it (so apologies for the lack of credit), but it's beautiful and it did inspire the recipe at the end of this blog post.............
Transition. I wonder if I’ll ever be able to make the transition to writing blogs in a different way? Most people tell me that it’s far better to write short and frequent blogs rather than the lengthy, irregular and infrequent ones that I tend to go in for. They’re probably right. On the other hand I find sitting in front of the computer for more than 15 minutes at a time to be extremely challenging. No, not because I’ve Attention Deficit Disorder, but simply because it makes me feel ill. Consequently, I’m pleased if I manage to post anything at all.........
Speaking of transition, I had the great pleasure last week of meeting up with Tamzin Pinkerton who, amongst many other wonderful things, writes for the food pages of a new Transition Network newsprint initiative: Transition Free Press. It’s a really good and informative read, with excellent contributions from many well informed people such as Shaun Chamberlin of Dark Optimism.
I was first in contact with Tamzin back in 2009 when she asked me to contribute to a book she was writing:
Although one could say it was written primarily to inspire, motivate, and provide food for thought and action for those already in or influenced by the transition towns movement, it should, does, and hopefully will inform and inspire anybody who cares to think about food in the context of sustainable living. Whether in the context of food or in other contexts, I think there can be a tendency to view talk of sustainability with suspicion, as being all right and good, but somehow all too worthy, earnest and humourless. That’s why the book is so good, because Tamzin shows quite the opposite, clearly demonstrating how thinking and acting in the realm of local and seasonal food is simply dam good creative and inspirational fun. Not only does it connect us more closely with our own deepest needs for friendship and cooperation with new friends and collaborators, it also connects us to the natural world in a fundamentally nourishing and grounding way.
I read the book four years ago and dipped back in to reread some of the contributions. I also reared my own and was amazed, staggered, and surprised! Incredibly unusually for me, I actually still agreed with every word I had said! I include the short piece below, followed by a video I recently made with James Wood (my collaborator on The Foraged Book Project) about the wonderful Jelly; and finally a seasonal recipe using that gorgeous wild food plant the stinging nettle (although there’s also a chocolate mushroom recipe in the video too).
Eating Wild Food: The challenges, benefits and consequences.
Eating wild food plants on a regular basis can improve your mental and physical health; diversify and enliven your daily menu; give you a really grounded sense of place; facilitate a deepening sensitivity to the environment; save lots of money; help you make new friends and, of course, facilitate spiritual enlightenment! Wild food defines who we are.
Throughout the vast sweep of human history, until relatively recently, our food has been none other than wild; our lives being orchestrated entirely by natural rhythms, the cycles and seasons, as we hunted, gathered, and engaged in humanity’s oldest occupation: foraging. Foraging wasn’t the mere search for food but an all-embracing lifestyle based on a respectful and reciprocally positive engagement with nature. A healthy, vibrant and flourishing outer environment was contiguous with the health of one’s inner world. Although we have mostly lost that connection, (in part due to the unsustainable dictates of a fossil-fuelled existence), foraging is a way of relearning how to reap the benefits that flow from a direct and intimate communication with nature: a practical, experiential, environmentally responsive and exploratory conversation with the natural world and our proper place within it.
The great wild-food adventure begins, of course, with plant and habitat identification, with the spring virility of the tree-sap harvest, the bliss of seaweed-searching seaside summer sun, autumnal mushroom mists and the frosty grubbing for winter roots. Of the A-to-Z of the hundreds of wild foods potentially available throughout the seasons many are simple to find, identify and prepare, while others require patience, persistence and a great deal of effort. Being skilled in the art of preservation and storage are also time -consuming, but deeply rewarding. Freezing, drying, pickling, bottling, brining, fermenting, smoking, etc. serve not only to preserve foods gathered at their seasonal best but also to provide the opportunity to create a colourful and kaleidoscopic range of foods unique in both texture and flavour.
For me personally, the greatest wild discoveries arise when going beyond simply substituting one or two ingredients in conventional recipes to eating nothing but wild food for entire days, weeks or months. The question then becomes how to get/make the essential and not-so-essential ingredients completely from scratch: bread, wine, salt, water, meat, flour, mayonnaise, houmous, pasta, vinegar, cakes – or, simultaneously, and more scientifically considered, how to obtain a healthy balance of protein, fat, carbohydrate, vitamins and minerals.
Take that biblically classic staple, bread, for example. In the absence of wild wheat, what and where are sustainable flour substitutes to be found – sweet chestnuts or horse chestnuts, acorns or rosehip seeds, reed-mace rhizomes or arum tubers? These are abundant resources, yet some are extremely toxic if not correctly processed when transforming them into flour so research, experimentation and creativity are needed. No wild non-wheat flours contain gluten, so seaweed extracts can be incorporated into chestnut and acorn bread dough to provide sufficient structural integrity to hold the finished bread’s crumb structure. Excess seaweed can be used for composting and the chestnut shells used for smoking seaweeds and other foods. Indeed, a sweet syrup can be obtained from the chestnuts prior to the solid residue being used to make flour, or acting as a chickpea substitute for wild-garlic houmous!
Foraging can be a joyful, reflective and deeply meditative experience either as a lone pursuit or in the company of friends. Indeed, working together helps to turn what may have seemed like wild-food chores into seasonal acts of ritual and celebration, such as opening a tasty stash of dried seaweed or sipping a potent glass of sea-buckthorn juice collected months before. In company, foraging tasks can be completed in a fraction of the time, providing an opportunity for play and debate, as well as the experimental exploration of innovative and sustainable food projects. The small-scale, community-level extraction of high-protein leaf curd from the leaves of nettles, wild garlic, mallow and others is just one example of sustainable, wild-food production that I am convinced has a crucial part to play now and in the future. A number of pioneers are already leading the way.
While foraging allows us to fully exercise our inherent creativity, imagination and sense of play, it does, like any activity, carry its own inherent risks. In order to feel vibrant and alive it is crucial, in the first place, that you remain alive. Following one simple rule will definitely help: don’t consume any part of a plant unless you have identified the plant with a hundred percent accuracy; you know that the part you wish to eat is edible in the condition in which you’ve harvested, prepared or stored it; and you are sure that it is not contaminated with pollutants. With a wealth of traditional knowledge as well as a constantly growing database of scientific research to explore, such a rule has become both increasingly easy and, due to the sheer volume of research, difficult to follow. If, like me, uncertainty appeals to you as an integral part of the attraction of foraging, and you choose not to follow this rule as strictly as sense dictates, may I half-jokingly and half-seriously suggest that you publicly document your triumphs and catastrophes (assuming you are well enough to do so). That way, others may learn from your experience and potentially fatal mistakes.
Wild food use, to remain sustainable, must be seen as simply one aspect of the collective endeavour to live and eat sustainably. Through mindful foraging and other slow, low-impact and reflective ways of procuring our food, (such as growing our own), we subvert the notion that food is a mere object or commodity, a barcode and bleep at the checkout, grown, graded, packaged, priced and distributed according to systems over which we have little influence or control. Foraging sustainably with an emphasis on quality over quantity, and food feet over food miles, can be seen as a radical act of rebellion against the current petrochemical-based systems of greed, excess transportation, packaging, waste and all-round general insanity associated with our industrial food system. By collecting just enough, just at the right time, just in the right place and with just the right company, foraging becomes an intentional act to embrace change and the eternal transition, with resilience, hope and growing wisdom.
----------++++++++++-----------
Jelly Ear Fungi
Jelly Ear fungi are the epitome of local, seasonal, common and readily available wild foods. Not only that, but they are incredibly versatile, being good for a wide variety of savoury dishes, as well as the odd (in a good way) sweet concoction. And yet they can also be used medicinally as well as in a number of other unusual ways as I describe in the video. But, remember to leave some for the snails.......
For some reason known only to the gremlins that inhabit Blogger, I couldn't post this in the normal way, so please just click on the link: https://www.youtube.com/watch?v=8UsX7vhbFGQ
Maple Leaf Nettle Crisp(s)!There are so many ways to work with nettles, and often the simplest ways are the best. On the other hand, it can be fun just to play around a bit. In both appearance and, crucially, texture and flavour I really like what I made here, BUT..................
Freshly picked spring nettles
Pick off all the stalks
Find and oil a maple leaf in good condition or (second best) cut out a shape on card.
Steam leaves for a couple of minutes and lay over pattern (2 layers).
Cover and press for an hour or more.
Remove from press and flip over.
Use a sharp knife to trim the edges.
Flip over again.
Remove card from back, then brush lightly with oil, salt and season, and either
dry flat with a thin weight on top, or dry as it is to get a crinkled effect........
Now, after 2 hours work, eat it in 2 seconds!
..........but I will never do this again as it takes far too long! Of course, that's to be expected when trying out a concept to see if it'll work. (By the way, I forgot to mention that the stalk is made from a thin and firm strip of pickled burdock root). There are two things I'd do differently. First, I'd search my nearest skip or pop down to the hardware shop, get a strip of metal and make various leaf-shaped cutters. Secondly, I enjoyed the flavour of the steamed leaves, but wouldn't limit myself to steamed and layered leaves. As part of this experiment I liquidized and seasoned raw nettle leaves with salt, pepper and wild garlic root powder. However I couldn't get this off the cut-out without it breaking, nor could I adequately cut leaf shapes from a large thin square of the puree that I'd dedydrated (although I still ate it quite happily of course). Indeed, dehydrated unshaped pieces are delicious and can be used in many dishes, as Pascal Baudar shows here:
A selection of different leaf-shaped cutters will make this tasty and decorative nibble worth making again, and not just with nettles but with all kinds of edible wild leaves...............
Any yet, there is another but.....
It's March; it's cold; it's raining, so there was no glorious warm sun to dry the leaves for this recipe. I used a food dehydrator, and that worked extremely well. On the other hand, one of my key motivations, apart from celebrating creativity and playfulness for its own sake, is to explore the extent to which wild food can be put to good use as part of a more sustainable life style, and that includes good n hearty rustic fare cooked over an open fire as well as more elaborate creations. Of course, a mass produced electric food dehydrator has nothing whatsoever to do with living a sustainable life style, except perhaps in a transitional sense. To that end, when I have an idea I look around me to see what I have available to make that a reality. Okay, 5 years ago I bought an electric food dehydrator so I'm gonna use that initially. It's great for all sorts of things: drying leaves for herbal brews, making fruit leathers, drying fungi etc. So yes, it can be excellent for making maximum use out of locally sourced and abundant wild foods. All the while though I'm thinking of steps to make the same projects more sustainanble. To that end, back in the autumn I got a copy of Permaculture magazine (no.73 autumn 2012), as it has a really good article by John Adams on how to build a solar food dehydrator (using plans from an American design taken from the book The Solar Food Dryer by Eben Fodor). Even here though, for sustainability to really have any meaning, one has to consider very carefully about soucing materials. Ultimately, dehydrating on tree stumps and hot rocks is the perhaps the most sustainable way!
As we transition from life styles that are completely unsustainable, to ones that are more sustainable, to ones that are long-term and fundamentally sustainable, it can be useful to think more systematically about the levels of sustainability in all things we do. To that end I give the last word to Mark Boyle. In his latest book The Moneyless Manifesto, he sets out a useful and systematic way to orchestrate ones thoughts and actions in this regard, according to what he calls POP model: Progression Of Principles. And, like all good moneyless initiatives this idea, as well as the whole book is freely available online. It's a good read!
Making sushi and nori sheets from scratch using wild seaweed varieties, wild fungi, lacto-fermented wild garlic leaf, fruit, and pickled rose blossoms.
"Life is too short to try and work out how to make nori sheets from scratch!" - a fellow foraging friend
Mixed nori and nori-style sheets
Finished sushi (recipe at the end of the blog).
When I’m not out foraging I’m usually still thinking about foraging, wondering where I can find this or that delicious wild edible, wondering how best to harvest, prepare, process and store my wild finds, wondering how certain plants, fungi and seaweeds have come into cultivation whilst others have remained stubbornly and gloriously wild, wondering why certain edibles are popular in some countries and not others. Seaweed is a good example of this. In Great Britain we are as phycophobic as we are mycophobic. That’s a great pity. Personally I’m a big fan of the briny, slimy stuff, and a deep and primitive fascination with seaweeds seems to be worked in to my DNA.
Of course, I'm not the only one. Ole Mouritsen a professor of biophysics at the University of Southern Denmark, is a distinguished cheerleader for seaweeds and the potential they hold. He sums up our phycophobic reluctance with an apt comparison. “The most important thing about getting people to use seaweed is to get people to focus on flavour. The problem is that most people associate it with something rotting on the foreshore. Suppose you had never seen apples and you see apples rotting on the ground – you would never think of eating apples. That’s the connotation most people have with seaweeds”.
The fact of the matter is I love seaweeds, and I love them as much as I love solving conundrums, such as the one below............
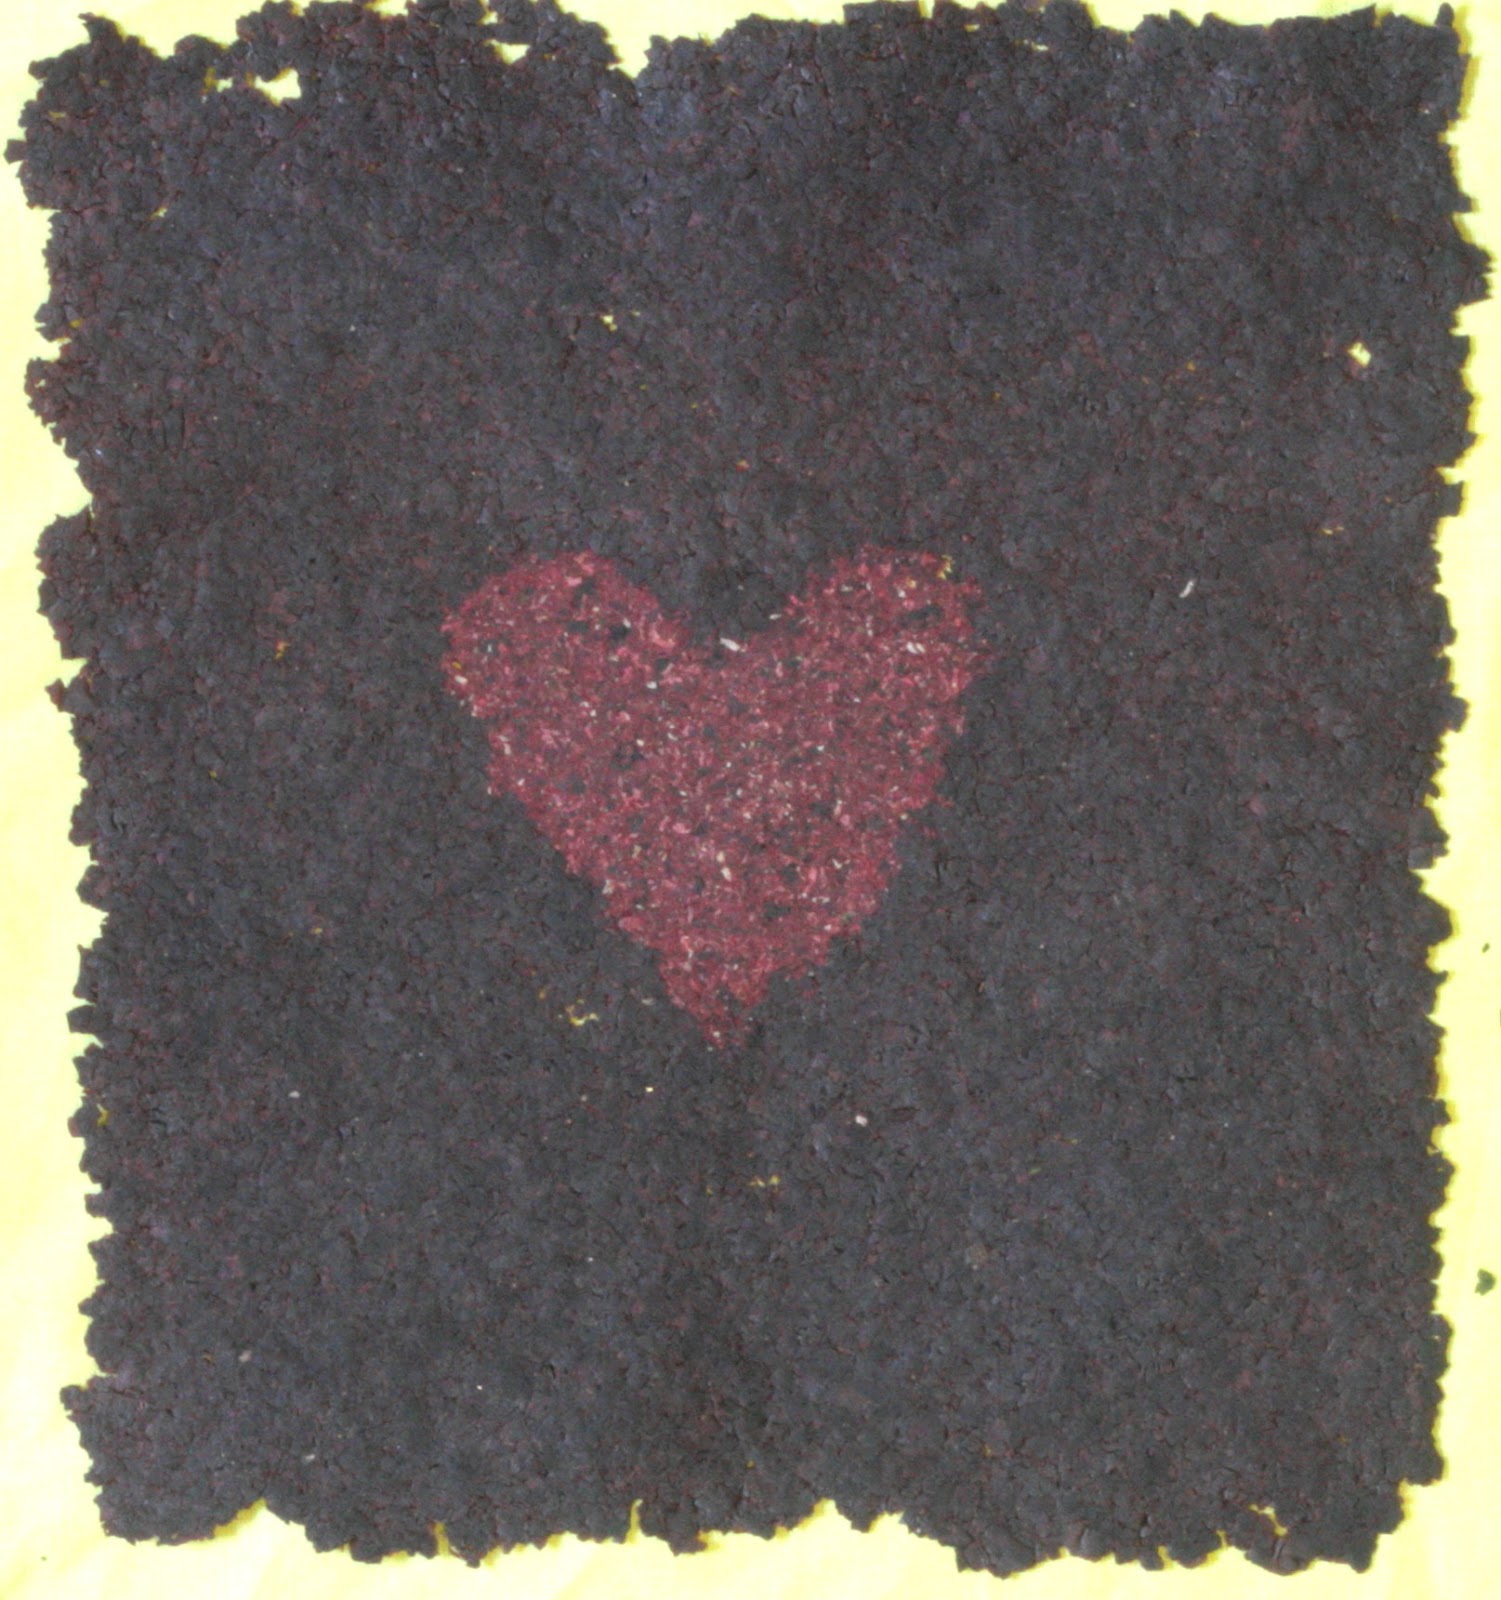
Nori sheet made with Palmaria palmata (dulse), Cryptopleura ramosa, and Heterosiphonia plumosa
For a number of years I've been a big fan of sushi, usually prepared with rice and raw marinated fish, but also purely vegetarian, vegan and, more recently, even completely raw vegan versions. Of course, what literally holds all this together is the nori sheet.
.
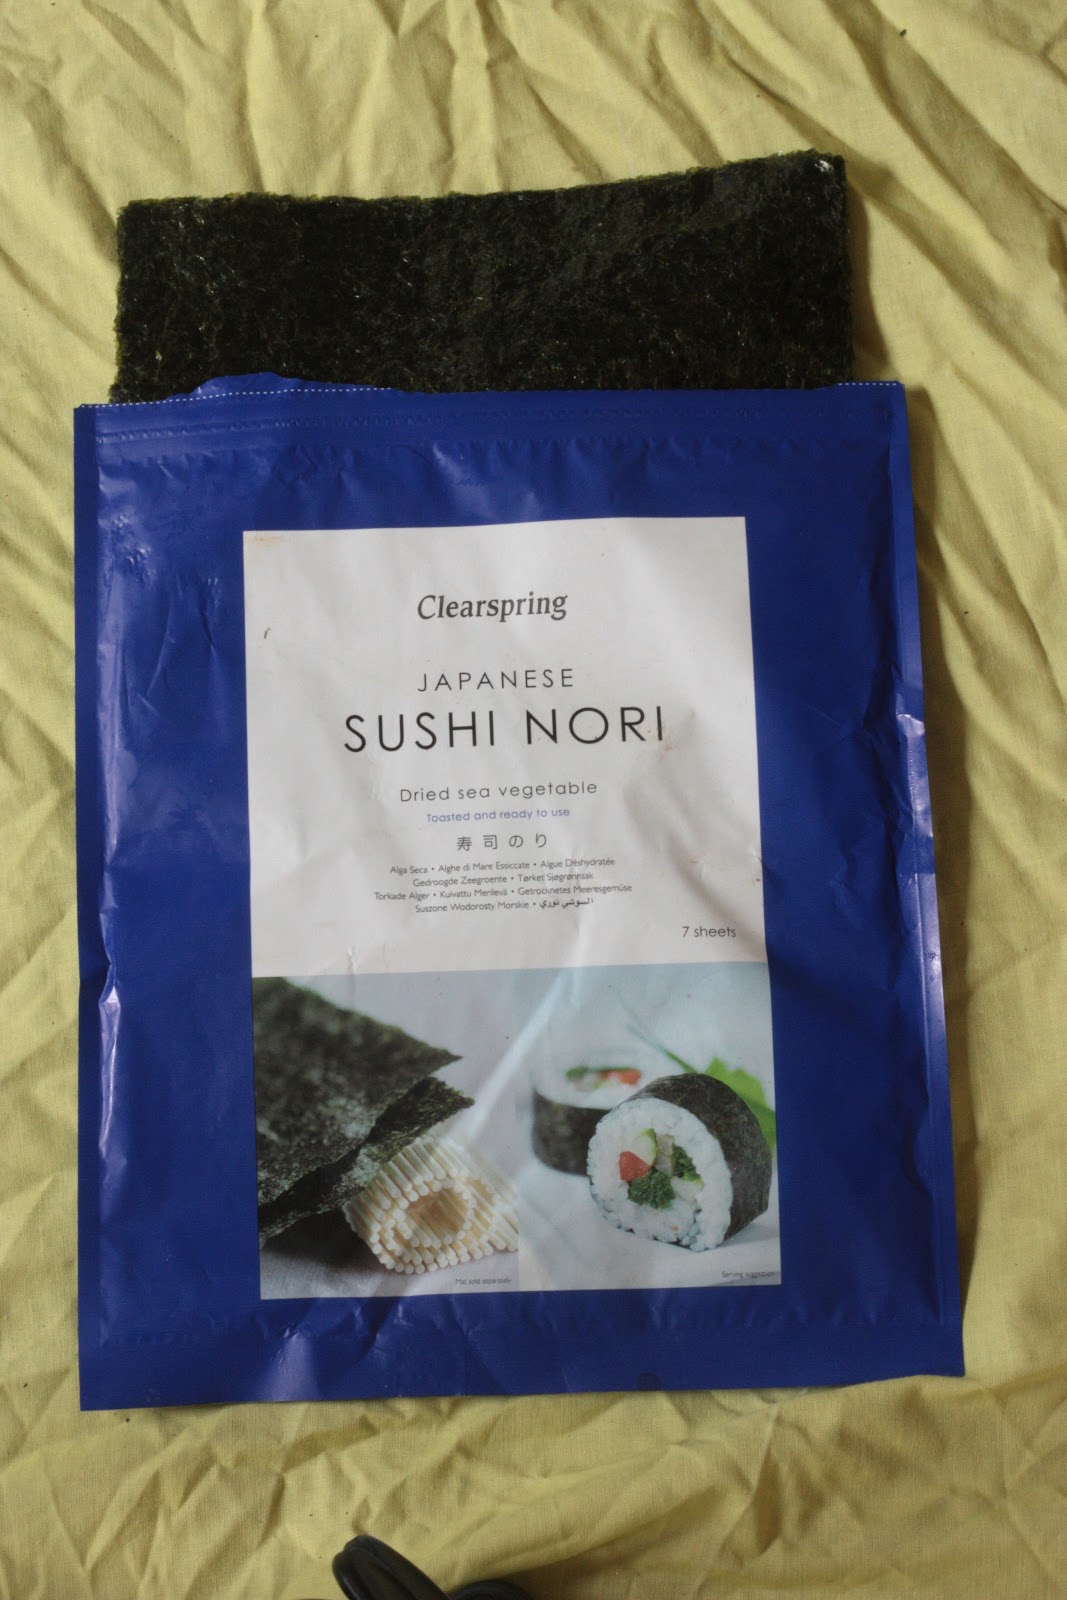
There are of course many brands of commercially and industrially produced nori sheets such as the Clearspring one above. There is no denying the excellent quality and consistency of these, and if you've never made sushi before then using these is a good starting place. On the other hand, several factors spurred me on to make my own. First, as I've indicated, there is simply the wonderful creative challenge and opportunity of working out how to do such things. Of course, I make no claims to originality in this. Nori sheet production arose out of traditional Japanese paper making techniques and has been perfected over hundreds of years. Despite this, my attempts to find any clear instructions in books or using the internet proved entirely fruitless. All references I came across claiming to describe how to make nori sheets from scratch were either just instructions on how to prepare sushi or described the industrial process of nori sheet production. One of my wild food motivations concerns issues of sustainability, and although I benefit from the mass production and global distribution of products such as nori sheets, I feel there is something deeply disempowering about the reliance on such systems and processes. So the creative empowerment that comes from keeping traditional knowledge alive and extending it with one’s own unique contribution is a strong motivating factor for me. Finally, there is the question of choice as well as the opportunity to use locally sourced ingredients.
Traditional Japanese produced nori sheets are primarily made from only one or two different porphyra species; what we in the UK, and especially Wales, know as the common seaweed laver. In Japan, Porphra tenera and P. yezoensis are the ones most frequently used. Given that in the UK we have at least 5 different porphyra species, as well as a number of similarly textured related species, there is great potential for small scale artisan nori production from UK sourced wild seaweeds.
Just before we get on to my experiments with different seaweeds, you might be interested to see the following video that documents nori sheet production from the initial conch shell inoculation, through the growing and harvesting phase, and right through to the final packing of the processed sheets. The technology used is advanced but not ultra high tech and is certainly ingenious. In many respects I admire the ingenuity and creativity from which it sprang; ironic really as I'm currently half way through reading Technological Slavery - The Collected writings of Theodore J. Kaczynski, a, k, a "The Unabomber", as well as John Zerzan's (editor) thought provoking anthology of writings: Against Civilization.
.
Which Seaweed Species Are Suitable For Making Nori Sheets?
From around the shores of the British Isles there are about 20 potential candidates, even more perhaps. So far I've tried and been successful using the following: Ulva lactuca, U. intestinalis, U. rigida, U. linza, Porphyra linearis, P. purpurea, P. umbilicalis, Palmaria palmata, Rhizoclonium riparium, Alaria esculenta, and an unidentified Cladophora species. Indeed, the use of cladophora species is interesting in that, in Laos, sheets, coarser, but not dissimilar to the Japanese nori have traditionally been made: kháy sheets locally produced from a cladophora species that we call Laotian Mekong Weed.
What I mean precisely when mentioning being successful in making nori sheets with the species mentioned above, is that either alone or in combination with one other seaweed they make sheets with a good flavour and texture. On the other hand, the number of potential species that can be incorporated into a sheet extends to 50+ if a certain percentage of powdered edible seaweeds (that for textural reasons can't be made into a sheet themselves) are incorporated into the nori sheet. One might do that to balance out the sheet from a nutritional perspective, a flavour point of view, or simply when playing with colour and the general aesthetics. To that end I've experimented quite a bit with incorporating the highly flavoured pepper dulse (Osmundea pinnatafida) and its relations into a number of sheets (as a powder), as well as Cryptopleura ramosa, Heterosiphonia plumosa, Callophyllis laciniata, Calliblepharis ciliata, Delesseria sanguinea, Hypoglossum hypoglossoides, Plocamium cartilagineum, Lomentaria articulata, Fucus serratus, Saccorhiza polyschides, Laminaria digitata, Saccharina latissima (formerly Laminaria saccharina), Sargassum muticum, Himanthalia elongata, and Codium fragile.
Rhizoclonium riparium. This has a great flavour, but due to its thin strands is best combined with Ulva lactuca when making nori sheets. Alternatively it makes a fetching wig - in my chubby hamster-cheeked opinion.
Porphyra purpurea
On many occasions individual porphyra specimens can be found that could be used to make fresh nori sheets without further processing. This is what I did for my first attempt to make sushi. If trying this, wash very well to remove sand, soak in acidified water for 5 minutes to kill off any bacteria - at least I like to believe it does; you could of course give it a 995 sacred geometryblessing (or alternatively boil for between 5 minutes and 2 hours and cool), then get wrapping. The result is quite acceptable and delightfully simple (provided you have a VERY sharp knife to cut the rolls - if using raw or only boiling for 5 mins)! The main reason for creating a nori sheet from dried and flaked material is for the improvement in texture, but fresh is definitely the way to go if you're into gourmet camping food.
Of course, apart from simply lifting the seaweed off the beach and eating it (likely to lead to diarrhoea by the way due to the likely presence of E.coli), the most profoundly simple and creative use for laver requiring no cooking pots, no cooking oil, and no modern technology whatsoever, is to generate a fire-by-friction using a bow drill, create a fire pit on the beach, burn down your drift wood to create hot embers, cover with a thin layer of some other more robust seaweed to prevent scorching, place parcels of laver-wrapped fish stuffed with wild herbs on top, add another protective layer of thin wood or seaweed, cover with sand/earth/shingle and bake for 20 minutes. Delicious!
Set the oven to 184.53°C
Delicious pungent herb-packed, pit-baked pike parcels - the favourite food of a-peck-of-pickled-pepper-picking Peter Piper.
Back to seaweeds suitable for nori making...........
Gutweed, Hulk Hair or Green Mermaid's Hair as I prefer to call it (Ulva intestinalis) has the best flavour of all the Ulva species
Dulse
Dulse (Palmaria palmata), flavour-wise, is my favourite seaweed of all. Indeed, in part, it was
my determination to make a nori sheet out of this that was one of the fundamental reasons for my persistence. For absolutely best results only harvest the most tender spring growth in April and May. After that, dry it and store for a year, opening the storage bag for a few hours each month to let a little moisture back in. This allows the flavour to develop as glutamate and mannitol/analine/proline (?) crystals form. I discovered this a number of years ago after initially being disappointed that I'd not managed to keep my dulse completely dry in storage. A recent conversation with fellow forager Miles Irving about experiments with dulse at the Nordic Food Lab confirmed what I already knew: it tastes better stored ever so slightly damp. If you are using aged and slightly off crisp dulse, dry in a low oven for 10 minutes to make it dry enough to crush. Also, you'll find that most of the amino acid salts will fall off onto the drying tray or be left in the bag. For maximum flavour, make sure you retain this and sprinkle it in as you're making the sheet.
The photo above shows the seaweed in May at which point it is thinner and more suitable - although an April harvest is best. From June onwards although the texture is fine at that time for other cooking purposes it's not suitable for nori sheets (at least not how I've described making them). I was just about to post this blog when I bumped into fellow forager Ross Evans who knows about the flavour development in aged dulse. Discussing the use of dulse in nori sheets, he stated an obvious point I was embarrassed not to have considered. That is, if you make the sheets in April or May and store (as described above) for a year, then the nori will naturally deepen and mature in flavour. Very true. Thanks Ross.
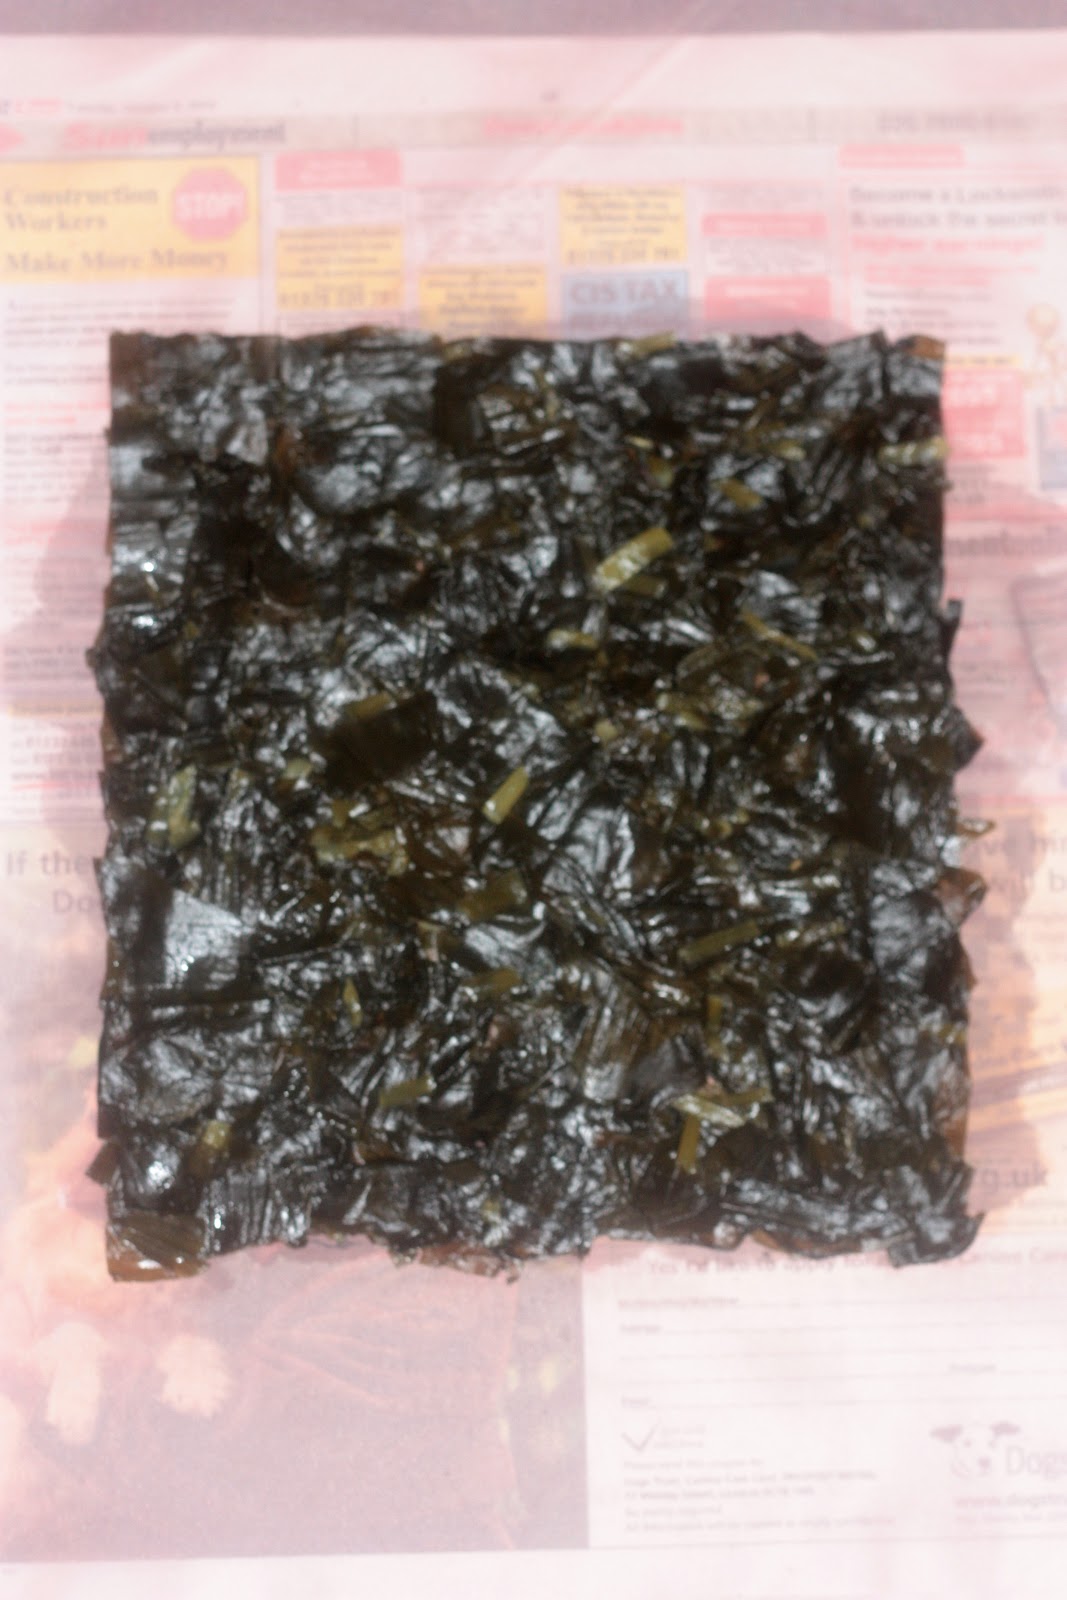
How to Make Nori Sheets from Scratch (method 1: Raw -dried, flaked and sprayed).
In this short stop frame animation video I don't mention much about the equipment you need - was too busy trying to keep up my narration as the pictures flew past!
You will see I have a press. This is just a little bigger than A3 size and is made, with adaptions, from an old trouser press I purchased on ebay. You will also need plenty of dry and uncrumpled newspaper, several fine mesh nylon sheets, a spray bottle, some water, and finally, of course, some dried and flaked seaweed. To prepare the latter, ideally collect in spring or summer on a warm sunny day. Rinse it in the sea and also at home if you fancy, squeeze out as much water as possible, pull open the scrunched up pieces and lay out in a single layer on a sheet in the sun to dry. Only do this during daylight hours. Turn all the seaweed over half way through and bring in an hour before sunset (even if it's not fully dry) to prevent it getting damp. Seal in an air-tight bag and lay out again the next day if necessary. Do this until it's crisp. In this country it's rarely hot enough to get it so crisp in the sun that it will crush and break up when you squash it up. To get to that level of dryness, finish it off for 10-60 minutes in a low oven (with the door open), in a food dehydrator or on top of a radiator. After that, crush it all up with your hands in a large bowl or bucket. For the thinner seaweeds it should be possible to do all this by hand, nevertheless, after some initial crushing, it can be helpful to put the seaweed in a food processor to grind up a little further. For best results flakes should be between 1-5 mm across; most being 3 mm.
Incidentally, my initial reason for making this press was simply to press seaweeds to create a record of my finds. If you've not done this it's well worthwhile. Pressed seaweeds are beautiful in their own right, as of course they are left in the sea. In fact, I really do believe that pressed seaweeds make inspired and inspirational art works.
Sea Beech Delesseria sanguinea
Sea Lettuce Ulva lactuca
Dabberlocks Alaria esculenta
What is wild food? Is it simply food? Is it medicine? Is it a work of art? Is it a life style? Perhaps it’s some or all of these things, aspects, and processes. I think that as human beings we tend to over compartmentalize, certainly I tend to. Some compartmentalization of thought and the actions issuing from that thought may be necessary for everyday adaptive functioning in the world; on the other hand, over compartmentalization suffocates a deeper more inclusive and reciprocal awareness and is anathema to free flowing creativity, to a deeper realization of connectivity, and the mutual interplay between seemingly different realms of existence. Wild foods are my medicines. Wild foods are my art. I am the art of wild foods. Hence, The Foraged Book Project.
A few months ago I was contacted via email by artist James wood. We’d never met. I didn’t know him. He said,
“I was wondering if there'd be any chance, as I'm not sure what type of work you're doing at the moment, if you would ever take on a type of apprentice to pass the knowledge you've collected on foraging food over to? And, if yes, whether that apprentice could be me, obviously we would need more contact first but it's something to think about.”
I get a fair number of emails like this. In fact, I love emails like this as I’m all for connecting and sharing with others. And yet, in the past 2 years after responding positively to such emails, all of these people have completely wasted my time by not showing up. Sadly, although I would like to reply courteously and positively to everybody irrespective of my negative past experience, in the past few months I’d decided enough is enough, and would have told James that I was far too busy. But how could I resist his further explanation:
“I'm currently studying on my third year of a Fine Art BA at Nottingham Trent University. Over the past two years I've been trying to make my own organic pigments and paper from locally foraged materials. I've managed to get the three primary colours from local privet fruit - purple/blue, Spindle Tree - yellow and cleaver roots for red. There’s also a black and white among other colours which can be used with egg yolk to create a suitable paint. I'm not sure how interesting you may find this but I thought it would be good to give you a bit of back ground.”
Of course, given that I’ve been making paper from various fungi for a number of years and have enthusiastically dabbled and doodled with pollen and spore paints (below), these words were music to my ears. For the first time ever I found myself sending a first email to somebody I’d never met or spoken to enthusiastically suggesting that we should make a book together, now! Arts Council funding awaits, fingers crossed. The aim is to produce a wild food book made entirely from natural foraged materials, with the text
and illustrations created using plant dyes, pollens and fungal spores. Artist Julia Groves, and perhaps Tasha Aulls are collaborating too. Please check out The Foraged Book Project and get in touch if this interests you.
.
Various papers made from Birch Polypore (Piptoporus betulinus) and Dryad's Saddle (Polyporus squamosus) Fungi.
Flower doodle using Reedmace pollen (Typha latifolium), Cramp Ball spores (Daldinia concentrica) and green walnut husk extract.
Cramp Balls/King Alfred's Cakes fungi (Daldinia concentrica) sporulating 5 days after being removed from log.
After 7 days.
Gathering up the spore mass.
Keeping the inspiration alive. Find somebody with more artistic abilities who thinks painting with fungi spores is interesting rather than an excentric waste of time; in this case my friend, artist and freediving supremo Anna Paraiyar.
How To Make Nori-Style Sheets From Scratch (a quick diversion - just in case we haven't had enough of them already and because life isn't all about seaweed....or is it.....)?
FUNGI
Technically nori refers only to seaweed. However, I realized that once a technique is mastered - or at leastlearnt; I'm a long way from mastery! - Why not play with it? Why not use it in unexpected but worthwhile ways? To that end I wondered what other wild and flavoursome foods could be used. The most obvious candidate was the Winter Chanterelle fungi (Cantharellus tubaeformis) I'd picked at the end of December, although I had my doubts - that proved right, that they would not be flakeable in either a fresh or dried state. Blitzing them up fresh resulted in a lumpy unspreadable mass. Drying them raw or cooked and then attempting to flake them resulted in a brown (from raw) or black (from cooked) powder with numerous hard granular bits. However, I did devise a method that makes superb and delicious semi-dry sheets.
.
Fresh Winter Chanterelles (collected 30th Dec)
detail
First I cooked them in a pan with about 2 tablespoons of water - more water isn't necessary because after 10 minutes of cooking the fungi have cooked down sufficiently to release much of their own liquid. I strained this off, reduced it down to a paste and stirred this flavoursome stock back in with the fungi whist heating to remove as much excess moisture as possible. To improve the flavour I also mixed in some finely powdered Boletus edulis (Cep/Porcini) powder.
.
Cooked and strained fungi with cooking liquor reducing in the background.
The fungi then need to be chopped as finely as possible and left to cool....
......before being carefully laid out and shaped into a square on the nylon sheets of the press. In order to facilitate this it was far easier to roughly spread the chopped fungi out first, lay a piece of nylon on top and squash and spread with the fingers through the second sheet.
.
Evening out the layer of chopped fungi.
Although this did press and dry well to form a storable sheet that still remained flexible enough to roll for sushi, the drying had toughened it somewhat. So rather than give it the 3 days drying time required I lifted another trial piece out after 12 hours in the press. That was excellent. It was very flexible, strong enough to move about quite freely without breaking and, best of all, fantastic eating as there was no hint of toughness at all.
.
Dried fungi sheet after 3 days
After 12 hours in the press. Perfect for immediate use!
LEAVES
For the most part, when I think about drying wild leaves it's usually because I'm planning to store them to make drinks. Leaves, though, as a wrap or finely chopped external covering do definitely have a place in wild and not so wild cuisine. Think of the nettle used on the outside of Cornish Yarg cheese, vine leaves as a wrap for both sweet and savoury items in Greek cuisine, and over the years I've used all sorts of wild leaves both raw and cooked to wrap various foods. Nevertheless, even given my experience, the thought of flaked and dried leaves to make sushi didn't have much appeal until, that is, I discovered the incredible flavours of lacto-fermented/krauted wild greens. Over the past few years I've been experimenting a great deal with wild leaf ferments. Plants with a robust flavour seem to work best, so many members of the cabbage family work really well, as do such taste sensations as alexanders or the seriously pungent ramsons/wild garlic. The latter is so good that over the Christmas period whilst doing all this experimentation I ran out of my own supply.
As good fortune would have it my friend and fellow born-to-be-wild forager Miles Irving of Forager only lives a few minutes’ walk up the road, and his base of operations is just down the hill. Quite some time ago I'd been enthusing to him about lacto-fermenting wild greens and getting him to taste some of mine. This must have left a good impression because what I hadn't realized until about a month ago, is that rather than making small batches in 1kg jars as I'd been doing, he'd began making leaf ferments in 40 litre barrels. Another difference was that whereas mine were quite complex involving balancing out the flavours with other grated vegetables, his were simplicity itself: leaves and salt. I popped down to his workshop and he gave me 1kg of his lacto-fermented wild garlic leaves. Thanks Miles! Absolutely delicious! In spite of writing a somewhat elaborate blog about making your own nori sheets, sometimes, much of the time, simplicity is the best approach.
.
1kg of 8 month aged lacto-fermented wild garlic leaf
My attempt to dry and flake it to make sheets didn't work. It doesn't hold together. Building up the sheets using fresh material did work.
Fresh sheet before pressing.
Dry sheet after 3 days in the press.
Tasty dried and powdered wild garlic lacto-ferment seasoning.
So did it work; was it a success?
What I came to realize years ago in working with wild foods, and in life generally, is that to be too caught up in the desire for a preconceived successful outcome, and certainly one that can blind to other possibilities, can lead to missing new opportunities and making new discoveries. In a sense then the answer is both "yes" and "no". It wasn't entirely successful in terms of my initial intention, and as a result I wasn't able to make a nori-style sheet from dried and flaked leaves. However, when after 3 days in the press I tipped out the dry material that hadn't congealed, I didn't throw it away but instead dried and ground it down further. It makes a wonderful seasoning on its own or mixed with flour. This is something I'd not even considered before. Next, because I'd not been able to make a sheet from dried and flaked material, I thought I'd just build up a sheet from the fresh lacto-fermented leaves. To do that it was useful to initially squeeze out as much liquid as possible. The discovery here is that the liquid alone is absolutely delicious and could stand as a worthy liquid condiment in its own right. I drank the whole glass. Also this liquid extract is going to be fabulous to experiment with in various liquid condiments I've been making with tasty seaweed and mushroom extracts. In terms of the finished dry sheet made from the fresh leaf ferment, it did hold together well. On the other hand, drying it completely did somewhat toughen it. This doesn't mean you can't make and store them, only that if you want to use them for sushi then you need to make the roll the day before then leave it wrapped in cling-film or similar in the fridge over night. That re-softens the leaf sheet. Nevertheless, similar to working with the fungi sheet, I found that for absolutely best results, the sheet should be built up from fresh lacto-fermented leaves, pressed for 12 hours and then used immediately. At that stage, it holds together well, the texture is still good, and it's very easy to handle.
Back on the topic of nori sheets genuinely made from seaweed for a second; what I forgot to mention was how delicious a sheet made from lacto-fermented Ulva intestinalis was. The jar shown below is one I took on a course I was running for a group of 8 chefs. It has been fermenting for over a year and the flavour is delicious (in my opinion), but completely divided the chefs. Half loved it and half loathed it.
1 year aged lacto-fermented Ulva intestinalis. I dried and flaked this before successfully creating nori sheets with it using method 1
PICKLED ROSE PETALS
Pickled rose petals, in this case Japanese Rose (Rosa rugosa), are one of those fantastically versatile ingredients that can happily complement and enliven both sweet and savoury dishes.
.
Pickled Japanese Rose petals (From Miles Irving's stash - thanks again Miles).
That I've not pickled rose petals before is something I find very strange. After all, I've dabbled in pickling almost every other wild food to the point of absurdity. Here are a few examples of some very basic pickling recipies. Perhaps the main reason is that all the petals I've gathered have been dried and powdered, finding their way into spice mixes or into cakes, biscuits and desserts, or have found their way into drinks such as sweetened rose petal vodka (below).
Having only a limited supply of pickled rose petals for this experiment, and learning from the experience of trying to make nori-style sheets from both fungi and lacto-fermented wild greens, I thought I'd skip (for now) the attempt to dry and flake the pickled rose petals and go straight for a semi-dry sheet made with the fresh pickle.
Building up the sheet from wet pickled rose petals.
For those of you that have tasted the profound benefits of a regular meditation practice but, like me, for some inexplicable reason, have lapsed and now find it difficult to incorporate into life on a regular and formal basis, making pickled rose petal sheets is for you! I'm playfully very serious. Of all the nori sheet experiments described in this blog, making this one had the potential to be the most slow and frustrating. Indeed, it was the slowest. In the first place, all the petals as they come out of the jar are all scrunched up and need to be individually smoothed out. Secondly, I had thought that one layer of petals would work but that a thicker and therefore more robust sheet would be easier to handle as well as being more flavoursome (turned out that, surprisingly, one layer was perfect). As a result it took 1 1/2 hours just to lay out two sheet, one with a single layer of petals, the other with two. Normally in such situations I'd be pulling my hair out in frustration after 10 minutes. And yet, the spirit of the rose is so beautifully calming, so serene, so gentle, so loving. Breathing out, I picked a petal from the pile, breathing in, I unfurled it, breathing out, I lay it down, breathing in, I paused before breathing out and reaching for the next petal and entered a timeless realm..........
after 12 hours
Just reflecting for a few minutes, I can think of all sorts of creative dishes this could be used in, not having tried any of them yet though I will remain silent until I can speak from experience.......
After 4 days.
FRUIT
You may be familiar with fruit leathers? These essentially, at their simplest, are thin layers of 100% flexible fruit pulp dried in thin sheets to exclude all moisture - although with a low sugar content they can be somewhat brittle. Made very thin they have great potential for artistic wrappings in meat dishes and, more obviously, desserts.
Now, you might be thinking this is too great a departure from nori or nori-style sheets to be included here, that I've gone mad, and that even when I wrap up to stay dry by putting on my coat to go out in the rain, I say to my girl friend, "hang on a second I've just got to put on my nori sheet!" Yes, you'd be right; every wrapping can't be classified as a nori or nori-style sheet. However, in recent years I've got into candying various seaweeds, after coming across some decent looking recipes in a number of books written by people who didn't look or sound like they'd lost their minds. Also, I'm quite obsessed with candying. That, combined with the fact that I'm always looking at new ways to incorporate seaweeds into my diet, made me think about incorporating candied (or uncandied) seaweeds into fruit leathers. Then, of course, we will have a sheet incorporating flaked seaweed and can call it nori to our heart's content.
I only had this thought yesterday so haven't had the opportunity to try it yet. The good news for me, and anybody who might like to try, is that right now in January it's possible to make my two absolutely favourite fruit leathers: rose hip, and strawberry tree fruit.
Rose hip fruit leather is amazing (provided you don't pick fermenting ones - they're usually a weird orange colour or, when you squeeze them, liquid is the first thing to ooze out rather than pulp). Simply boil up the hips in water, mash, strain and reduce down the liquid. Transfer to a nonstick sheet and dry further. The result, although wonderfully flexible due to the high sugar content, looks amazingly like stained glass, having the taste and texture of fruit pastels. My plan is to mix in powdered seaweed or ground candied seaweed after the final boiling.
Strawberry Tree fruit are fantastic. The species part of the botanical name for the plant, Arbutus unedo, means "I eat one only". This is obvious really, because after eating only one, you'll immediately be thinking what a fantastic fruit leather it will make, so will be too busy gathering to eat any more.
.
Most typically in the South East of England this fruits in late Nov/early Dec but can fruit much later.
After 15 minutes picking.
The raw fruit is mashed and passed through a seive to remove the granular parts, and then squeezed through a fine cloth.
The raw pulp is spread out on a non-stick sheet before being put on a tray left on the food dehydrator for about 8 hours. I plan to mix in powdered seaweed to the raw pulp before spreading.
The finished fruit leather.
The flavour is the nearest you'll get to tropical fruit from something you've harvested in the UK. Imagine a cross between mango, papaya and persimon. This is not obvious from eating the fresh fruit. Coincidentally, I've just noticed that one of my favourite wild food bloggers, Jonathan Hamnet - who emailed me a couple of days ago with generous words of encouragement - has some interesting things to say about this fruit's inclusion in a fruit leather: Trail Food from the Golden Age of Man.
THE WEIRD!
So far we’ve looked at the use of seaweeds, fungi, lacto-fermented wild leaves, fruit leathers and pickled rose petals as suitable for making nori or nori-type sheets, but we haven’t yet considered anything really wacky. A short time ago a facebook friend and fellow forager Sally Harte posted a picture on line of some small green slimy thing asking what it was. I said it looked like some kind of horrible cyanobacteria. Why ‘horrible’ I don’t know? A little further research by Sally revealed it to be a type of cyanobacteria known as Nostoc commune. Given that I see this quite frequently, coupled with the fact that, according to the Wikipedia link, it is eaten in Japan, China, Indonesia and the Philippines, I rushed out to the nearest spot I know where it grows in profusion. Alas, none was there. I’m sure this would make a great nori-style sheet so can’t wait for it to start growing again.
How To Make Nori Sheets From Scratch (method 2: The wet paper-making way using dried and flaked and then cooked seaweed).
Given that this method is closer to the traditional way of making paper, a technique out of which nori sheet creation arose, the results were very disappointing. Compared to method 1, in this instance, I found it so much harder to produce a nori sheet of even thickness. Also, in spite of being well pressed down, the sheets made in this way still tended to crack whilst drying. On reflection I think this may not be due to any inherent problem with the technique but, rather, due to my inappropriate application of it. Specifically, whereas when using the first method I made sheets that were of the fairly small traditional size, for the paper method I leapt up about 4 sizes to A3 size. That fact, combined with the issue of my water tray not being quite deep enough, I think, led to all the problems encountered. More experimentation required using a smaller sized paper deckle............
An aside: I got hold of a super impressive microphone not with a view to narrating these stop-frame videos, but to support and publicise my friend Mark Boyle's excellent recently published book The Moneyless Manifesto through creating a free on-line audio version of the book. I was rather blasé about the ease of doing this, especially when he told me an actor audio-booked his first book. "Who needs actors", I said! Given that it took me about 4 attempts to narrate each of these videos I'm now laughing at my, at best, naive optimism, at worst, misplaced arrogance. But, I will still try to do it........ In the meantime the book can be purchased or read for free at: http://www.moneylessmanifesto.org/ (I contributed a short article on making leaf curd).
Trouble Shooting (for method 1: Dry, flake and spray).
Help! Day 3 of pressing and my nori sheets are going mouldy!
Yes, during my first attempt to make these the tell tale signs of white mould spots started to form from the centre of the nori, spreading out with each passing day, whilst , in denial, I continued to convince myself that these spots where just benign salt deposits forming as the sheets dried. We see what we want to see!
mould!
Obviously mould is unwanted. In order to prevent this there are a number of variables to consider. Taking into account just one of them may solve the problem; adjust your technique to address all of them and success is guaranteed.
In order to grow, mould needs water, food and time, and will occur if the sheets aren't dried quickly enough. In a solid press like mine the sheets dry in 3-4 days in an averagely warm room. Ideally drying time should be no more than 3 days and ideally two. The time taken to draw out the moisture can be reduced in 3 main ways: Change the newspaper more frequently - 3 times a day rather than 2. Increase the temperature by placing the press in a warm airing cupboard or on top of a radiator. Use a press that allows for better moisture evaporation. For example, most seaweed presses are of the wooden lattice design and are tied up with straps. The problem with that is that for the purposes of nori sheet making you can never get it tight enough. An ideal design would be a lattice wooden or metal press that can be screwed down like mine. Must make one of these.......
Another idea if after a day or two you spot the early signs of mould is to stop it in its tracks by lifting the half dried sheets from the press and drying quickly by some other means, such as using a radiator, food dehydrator or low oven. Do dry them flat if doing this and be sure to return them for a final press before they become too dry and brittle to handle.
I also found that liquidizing a couple of garlic bulbs in my water spray greatly reduced the likelihood of mould forming, although, of course, it left a garlic flavour that might not always be wanted.
Finally, if you do have a problem with mould, don't use the same newspaper for your next batch of sheets, and wash and dry the nylon sheets very well before re-use.
Help! My sheets are dry and look great in the press but when I take them out they just disintegrate.
Several things could have occurred here. It could be one of, or a combination of the following reasons: your flake size is too small; your sheet is simply too thin; the flakes are just too thick; you are using a plant material that no matter how you prepare it, it simply will never hold together. A good example is lacto-fermented wild garlic leaf. It tastes delicious, dries, flakes and sprinkles well, looks like it’s held together but disintegrated. In the case of wild garlic and some other plant leaves this problem can be got around by creating the sheets by laying down fresh leaf material – a bit of a fiddle, but worth it. If using fungi, the building up of sheets by laying down finely chopped cooked fungi is the only method I’ve used that works. Drying and attempting to flake fungi generally results in an unpressable powder or big and unpressable hard granules.
Help! I’ve pressed the sheets for 3 days and have just removed them from the press to put over the radiator/food dehydrator/low oven so as to remove all moisture and prevent mold formation, but now they are not flat, are very brittle and I can’t flatten them out without breaking them!
or....
Help! My sheets are dry and hold together well, but when I come to roll them to make sushi they crack and break.
Okay, yes, this happened to me and, yes, it was bloody annoying! If you have a room in your house that is fairly damp, just leave the sheets there for an hour or two (or even a day or two) to take on a bit of moisture from the air; alternatively place on a tray and leave outside (assuming it’s not raining or snowing)!! Both these methods only really work during the cooler months of the year. Alternatively, soak a tea towel and wring out VERY well so that it’s just damp. Carefully lay over the nori sheet for a few minutes. Finally, being very careful not to over soak – and from a distance of a few feet - you can spray a few pumps of water over the sheet and leave for a few minutes.
A completely different technique that works very well is to add a tiny amount of oil during the process of creating the sheets. To do this, make the sheets in the usual way, i.e. by spraying a fine mist of water (not oil) over the sheets and then press for two days. After that, before pressing again, spray over about 4-5 light mistings of fine oil spray on each side of the nori sheet. Actually, 4-5 sprays each side is only appropriate if you have a spray nozzle that works with oil. I’ve used the oil spray ‘bottles’ you can buy in the supermarket – weird people worried about their fat consumption use them (apologies if that means you - weirdo) ! If you’ve been spraying with a nozzle designed to spray water or alcohol, trying to use it to spray oil will result not in misting but, rather, in jets of oil as if you’re firing a water pistol. Not to worry though. Simply mix olive oil and water in a 1:1 ratio and shake well before spraying. Using this method requires about 20 sprays each side of the sheet. It is important to bear in mind that such oil spraying should only be done after the sheet has been pressed first and certainly not during the process of building up the sheet initially, to do so would adversely affect the binding of the sheet so that it would be more likely to disintegrate. Note: If doing this, especially if you intend to store the nori sheets for quite a while, don’t use an oil such as walnut or hazel nut oil as they are more likely to go rancid than other oils, e.g. olive oil. Also be aware that when using the oil method it can sometimes be hard to tell if all moisture has been removed. As in most things, practice and experience makes perfect!
By the way, you might be wondering why, if the oil method is such a good technique I don’t just write about that and thus avoid all the potential problems that can result (if you’re not careful) from using water spray only? There are two reasons. In the first place, I’m trying to mimic traditional non-industrial processes, i.e. the way I suspect (without much evidence other than a strong intuition) that I would imagine the Japanese used to make nori sheets for hundreds of years. Secondly, in 2013 (from 1st April or May – not quite decided) I’ll be attempting to live for a year entirely on wild/foraged foods. For me, the creation of these nori sheets is part of the detailed experimental research I’m doing in preparation for that year. In terms of fats/oils, so far I’ve managed to extract walnut oil (that goes rancid after prolonged storage) and badger fat (that I can’t get to form a spray). Of course, olive oil works really well, but I won’t be able to make that in 2013 in the UK.
Help! I think I’ve got the flake size right but am having trouble creating sheets of an even thickness.
Several factors lead to this problem. Make sure that the fabric squares that you are sprinkling the seaweed on to are completely flat (iron them if necessary). Also make sure you have covered the fabric with a fine mist of water spray. When it comes to sprinkling the seaweed, using a sieve can help (although most have holes that are too small). Also, sprinkling a very even thin layer first, then spraying (water) before adding a second layer is better than trying to get a full thickness in one covering. After that, if any background cloth can be seen, just take a pinch of dried seaweed and cover individual gaps. Spray well a final time waiting a few minutes for the water to be absorbed before pressing.
Help! My sheets turned out perfect but I’ve stored them for a month and they have gone mouldy.
After all that effort this would be a frustrating outcome indeed. I store mine in the same way as you’d find nori sheets when you buy them in the shops, that is, stored flat and completely dry in a plastic bag with an air-tight seal. Similarly, as many commercial producers do, you can put a small pack of silica crystals in with your nori sheets to attract any unwanted moisture. The use of silica crystals is very useful if you initially used seaweed that was only rinsed in the sea and, hence, has a substantial amount of moisture attracting salt in/on it. Of course, you could just have rinsed in fresh water initially. Yes, that’s obvious, but sometimes the nori does taste better when the seaweed has a natural coating of sea salt, and in actual fact no matter how you initially prepared the nori it will still attracted water and potentially degrade if you don't take precautions.
Sushi Recipe
Ingredients (to make 2 rolls)
2x 3oz skinless salmon steaks
some short grain rice, cooked and cooled
Marinade: juice of 2 pink grapefruit juice of 2 limes
juice of a large lemon
1 medium sized red onion finely chopped
some finely chopped fresh ginger
some finely chopped garlic
some finely chopped fresh chilli
1-2 table spoons liquid aminos/soy sauce or similar
Sun-dried tomato paste
1 spring onion
1 ripe avocado
a little freshly grated horse radish
1 tablespoon finely chopped bell pepper
2 teaspoons wild charlock seeds (or other mustard seed)
4 tablespoons of lacto-fermented wild green*
Method
*I see from the label on my jar of fermented wild greens that it was made on 29th March 2012 and contains chopped Hedge Mustard (Sisymbrium officinale), Common Nettle (Urtica diocia), Rape leaf (Brassica napus), diakon radish, onion, carrot, sweet red pepper, a little chilli pepper, sea salt and whey.
I started this blog with a quote from lovely fellow forager Rachel Lambert, suggesting that: "Life is too short to try and work out how to make nori sheets from scratch!" Well, there's a long debate to be had there. In some respects though she may well be right. Nevertheless, for me what's important isn't so much the goal as the journey; living each moment of that journey intensely, creatively, playfully, and with a full awareness of the possibilities of any given moment along the way - actually I'm sure Rachel would agree too. It ain’t easy!
I want to finish with a quote too, about another journey. Quotes or discussions with people that suggest something can’t be done or isn’t worth doing, I find act as a great stimulus to action.
Writing In Proceedings of the Oxford Symposium on Food and Cookery 2004: Wild Food, Susan Campbell claimed not to have “met anyone who could convince [her] that modern man could subsist on wild food alone, legally or illegally, the year round, in a northern climate.” – from The Hunting and Gathering of Wild Foods: What’s the Point? An Historical Survey.
Beginning later in the year, April or May, I intend to try and convince her, and myself, that it is in fact possible to live entirely on wild food the year round in a Northern climate. I’ll be writing more about that project in the next blog.
I hope I can count on your support because I can't do it alone...................